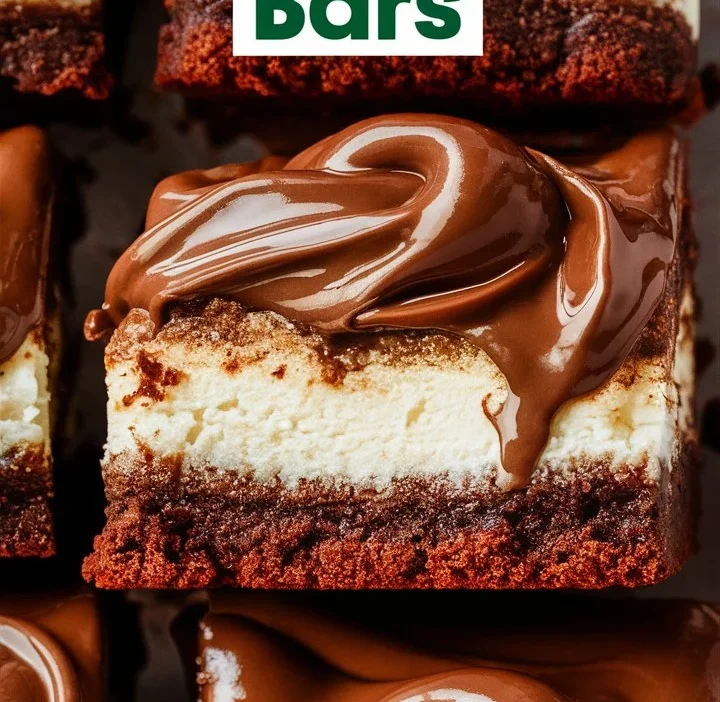
If you’re searching for a dessert that’s rich, creamy, and irresistibly indulgent, Nutella cheesecake bars are the perfect choice. Combining the smooth tang of cheesecake with the nutty chocolate goodness of Nutella, these bars are a guaranteed crowd-pleaser for any occasion — whether it’s a birthday, family gathering, holiday, or just a personal sweet craving.
In this complete guide, you’ll find not only a foolproof recipe but also pro baking tips, storage advice, variations, and FAQs to help you master Nutella cheesecake bars like a pro.
⭐ Why You’ll Love This Recipe
- ✅ Beginner-friendly – Easy steps with professional results.
- ✅ Versatile – Works as a no-bake or baked dessert.
- ✅ Crowd-pleasing – Perfect for parties, potlucks, or gifting.
- ✅ Customizable – Gluten-free, keto-friendly, and mini versions possible.
- ✅ Make-ahead friendly – Store or freeze for later without losing flavor.
🥄 Ingredients You’ll Need (and Why They Matter)
For the crust:
- Graham cracker crumbs or Oreo crumbs – Adds crunch and structure.
- Melted butter – Holds the crust together.
- Sugar (optional) – Enhances sweetness if using graham crackers.
For the cheesecake filling:
- Cream cheese (softened) – The creamy, tangy base.
- Nutella – The star ingredient, infusing chocolate-hazelnut flavor.
- Granulated sugar – Balances tanginess of cream cheese.
- Eggs (if baked version) – Adds structure and firmness.
- Heavy cream or whipped topping – Lightens the texture for no-bake versions.
- Vanilla extract – Enhances flavor depth.
Optional toppings:
- Roasted hazelnuts (crushed) – Adds crunch.
- Chocolate drizzle – Intensifies indulgence.
- Sea salt flakes – Balances sweetness.

👩🍳 Step-by-Step Instructions
Step 1 – Prepare the crust
- Mix crumbs, melted butter, and sugar until combined.
- Press firmly into the bottom of a lined 9×9-inch pan.
- Chill for 10–15 minutes (no-bake) or pre-bake at 350°F (175°C) for 8 minutes (baked version).
Pro Tip: Use the bottom of a glass to press the crust evenly for a firm base.
Step 2 – Make the filling
- Beat softened cream cheese until smooth (avoid overmixing).
- Add sugar, vanilla, and Nutella; blend until creamy.
- For the baked version → add eggs one at a time, mixing gently.
- Pour filling over prepared crust.
Step 3 – Bake or chill
- Baked: Bake at 325°F (160°C) for 35–40 minutes, until edges are set but center is slightly jiggly.
- No-bake: Refrigerate for at least 4 hours (preferably overnight).
Step 4 – Finish & serve
- Add toppings of choice (drizzle, nuts, or whipped cream).
- Slice into bars using a warm knife for clean edges.
🧾 Nutritional Information (per serving – approx.)
- Calories: 310
- Carbohydrates: 28g
- Protein: 5g
- Fat: 20g
- Sugar: 21g
Note: Values may vary depending on ingredients and portion size.

🔄 Variations to Try
- No-Bake Nutella Cheesecake Bars – Quick and summer-friendly.
- Baked Nutella Cheesecake Bars – Richer flavor and firmer texture.
- Mini Cheesecake Cups – Perfect for parties, baked in muffin tins.
- Gluten-Free Version – Use almond flour or gluten-free cookies for crust.
- Keto / Low-Carb – Swap Nutella with a sugar-free hazelnut spread.
🍴 Serving Suggestions
- Best served chilled for a firm, creamy bite.
- Pair with hot coffee, cappuccino, or even dessert wine.
- Garnish with berries for a fresh, tangy contrast.
🥶 Storage & Make-Ahead Tips
- Refrigerator: Store in an airtight container for 4–5 days.
- Freezer: Freeze up to 2 months; thaw overnight in the fridge.
- Tip: Add toppings after thawing to maintain texture.

❓ Troubleshooting & FAQs
Q: Why are my cheesecake bars too runny?
A: Overmixing or under-chilling can cause this. For no-bake, ensure at least 4 hours of refrigeration.
Q: Can I double the recipe?
A: Yes, but use a larger pan and adjust baking time by 10–15 minutes.
Q: How do I cut clean slices?
A: Use a sharp knife dipped in hot water, wiping between cuts.
Q: Can I substitute Nutella?
A: Yes, any chocolate-hazelnut or nut butter spread works.
🏆 Final Thoughts
Nutella cheesecake bars are more than just a dessert — they’re a fusion of indulgence and elegance in every bite. Whether you choose the no-bake method for convenience or the baked version for richness, this recipe guarantees a decadent treat that looks impressive and tastes even better.
Try it once, and it may just become your new signature dessert for every celebration.